Adobe Suite: Creating A Custom Text Box

If you read the post on Using the Pen Tool, you might have learned that along with the Pen Tool − which allows users to create their own vector shapes − there are several other interchangeable tools that exist for the three main Adobe programs (Illustrator, Photoshop, and InDesign). Today though I would like to show you how the Pen Tool and the Type Tool, both interchangeable can be combined in the three programs to create a custom text box.

NOTE: Most of this tutorial will be done within Illustrator unless noted.

CREATING THE SHAPE

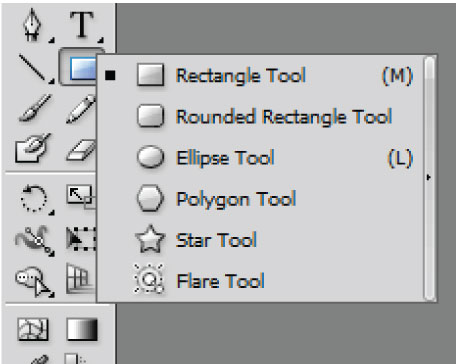
To create your custom text box you must first create either a shape or line. With the Type Tool alone you can only truly create either a rectangular or lined text box. You can use the typical rectangle tool, rounded rectangle tool, ellipse tool, polygon tool, star tool, etc. Within each program these options will vary, however the ones shown below are for Illustrator.

Shape Options within Illustrator

Above are the shape options within Illustrator.

To create the shape in any of the programs just select the shape you would like, then click and drag to create it on the canvas of the file.

The Pen Tool can also be utilized to create custom shaped text boxes. Please refer back to my tutorial on using the Pen Tool for a more details, you can find it here!

If you’ve created a shape, then we are ready to add text!

ADDING TEXT

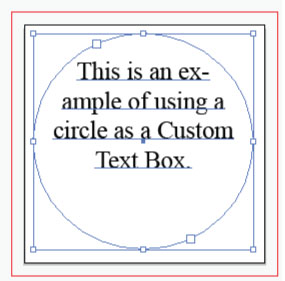
To add text to just the shapes within any of the programs, just select the shape and then the Type Tool. Place the cursor over the text box’s outline and then click. You should then be able to type within the shape.

Here is an example using a circle:

Circle with Text

Here is text written inside of a circle.

Continue reading

Adobe Suite: Using the Pen Tool

Some might not know this, but Adobe has many tools that are universal between the three main design programs: Illustrator, Photoshop, and InDesign. Even though they all handle different types of designs—Illustrator does vectors, Photoshop is photo editing and for some a painting program, and InDesign is a design text editor— all three are pretty much compatible and several of their tools perform the same functions. Some examples are the Type tool, the Pen tool, the Eyedropper tool, the Pencil tool, etc. However the main one today I would like to feature is the Pen tool.

The Pen tool is a tool that is typically something that a designer either loves or hates. I personally have a love hate relationship with it. And is an interesting feature, because it allows you to create your own shapes, vector images, and allows you to easily trace images. But you can also create text boxes with it as well.

Today’s tutorial though will cover the basics of the Pen tool, which is universally applicable to Illustrator, Photoshop, InDesign and After Effects. Since I have no experience with Adobe After Effects, I suggest going to this Adobe TV link for more information. However, if you would like to find out more about the other programs continue reading below. I will be showing the information in this tutorial through Adobe Illustrator, everything I will be doing is applicable in Photoshop and InDesign.

THE BASICS

The Pen Tool has several settings that help create shapes and effects. If you’ve never used the Pen Tool before, or are completely new to the Adobe Suite this is what it looks like in Adobe Illustrator:

Pen Tool in Illustrator

The Pen Tool is an essential item for any designer that uses Photoshop, InDesign, or Illustrator. This is the location of the Pen Tool in Illustrator.

The Pen Tool looks pretty much the same in Photoshop and InDesign, with the same features, just located in different places.

Continue reading

InDesign: Working With Corners

Adding lines to a design in InDesign is just as important as the corners you use for those lines. Corners for a simple design in InDesign can add a more person touch or add something that will make it pop! InDesign delivers several different options for corner designs, so let me go ahead and show you what they are and how it’s done.

TYPES OF CORNERS

InDesign offers six different options for corners: Square, Fancy, Bevel, Inset, Inverse Round, and Rounded, all pictured below (click the image to make it larger).

The 6 InDesign Corners (Example)

Here are the 6 corners available in InDesign.

Each are easily accessed, and you can combine more than one on a square as well. Follow along with the rest of this post to find out!

Continue reading